1.
Place the Track ‘n Trade Pro CD in your CDROM
Drive.
2.
The following screen will automatically
open when the CD starts:

3. Click
on the “Install Track ‘n Trade” button. You will then be presented with
a choice to install the full licensed version, or the demo trial version
of Track 'n Trade Pro 3.0. If you have purchased the software, click the
Full Version button. If you would like to try the software, click the
Demo Version button. Depending on which button you click, either a full
or demo version installer will be launched. We don't recommend having
the full and demo versions installed at the same time.

The following steps describe installing the full version of the
software. Installing the demo is only different in that it does not
require a serial/key code. Instead it asks you to let us know where you
received your demo from. This may be a simple 4 or more character demo
'key', or the name of the magazine or web site you learned about the
software or requested the demo from.
-
Screen
one is the Welcome Screen. Click on the “Next” button to begin.
-
Screen
two is the End User License Agreement. Click on the “Yes” button to
continue or the “No” button to cancel installation.
-
Screen
three is the Serial/Key Code screen. Enter the Track ‘n Trade Serial
number from your email (received after placing order) or packing slip
(received with software). Demo users will be prompted for their
demo source here.
-
The format of the key code is this: TTxx-xxxx-xxxx If you have
any questions about your key code please contact the sales department at
800-862-7193.
-
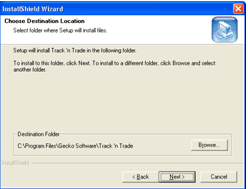
Screen four determines the directory in which you will install
Track ‘n Trade Pro. It is recommended that the software be installed
in the default directory.

-
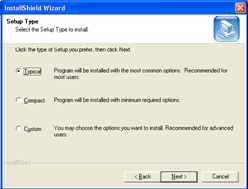
Screen five has 3 options for installation:
a.
Typical - Installs all of the Historical Data.
b.
Compact - Installs minimal history and no help files.
c.
Customer - Gives you a list of installation options to choose
from.

-
Once
you have selected your installation preferences, the files are copied to
your hard drive. The progression bar will indicate when the
installation process has been completed.
-
Click
on Finish to complete the installation.
Screen Resolution Changes
Track 'n Trade Pro v3.0 was designed to fit on a
desktop area of 1024x760 pixels and 96 dpi. While it is possible to use
the software at a lower resolution or different dpi settings, you may
experience difficulties seeing all of the toolbars or getting the proper
reading from the cursor price.
To Change your screen resolution to 1024 x 768:
1) Click on the Start Button
2) Click on Settings
3) Click on Control Panel
4) Double-click the Display icon. This will
bring up the Display Properties Screen.

5) Select the Settings Tab.
6) In the Screen Resolution section, you will
slide the bar until it
says 1024x768 underneath the slider box. See Screen Shots Below:


7) Click on the OK button.
8) If you asked how you would like the
settings applied, select
Apply changes without restarting. You settings will be changed
giving you a few seconds to confirm the changes. Click on the
OK button in the window.
9) To check the DPI setting or to change it back
to 96, click on the Advanced button in the picture above, then chose
Normal size (96 DPI) from the DPI setting list.
Selecting the normal size 96 DPI setting.

Some cursor price and text alignment problems are
caused by having a value other than 100% selected in the custom dpi
settings. Please ensure that this value is set to 100%.

Note: If your screen is unreadable
after the settings are changed
simply wait a few seconds and your monitor will reset to the previous
settings. In this case your video card or monitor may not support
this high of a video setting. Please consult a qualified computer
technician to upgrade or repair your computer.
Videos
and Windows Media Player
1) Nothing happens when I click the video buttons:
If nothing happens when you click on the video buttons in the TnT
Installation program (autoruntnt.exe on the CD-ROM) you might not have
Windows Media Player 7.0 or later installed on your computer. The videos
included on this CD-ROM have been formatted in Microsoft's .wmv format.
We have included the installer for Windows Media Player 7.1 to make it
easier for you to upgrade and watch these videos.
2) The videos look small, distorted, or squished:
If you do not have the Classic (in Windows 95, 98, 2000) or Default
Media Player (in Windows XP) skin selected, the video may be distorted.
We recommend that you switch to the default or classic skin. These skins
do not have borders on their left and right sides so they do not stretch
or squish the video.
You may also switch to/from full screen mode by pressing alt-enter (the alt and the
enter keys at the same time) while the videos are playing. Full screen
mode viewing will give you the best video experience.
If the videos are still small or squished with the
default or classic skin selected or running Windows Media
Player in full screen mode ,
make sure your display is set to at least 1024x768, as described above
in the screen resolution change
section.
Choosing the Default Media Player skin in Media
Player 8.0, Microsoft Windows XP

Choosing the Classic skin in Media Player 7.1,
Microsoft Windows 98SE
